We used Dreamweaver almost exclusively through school. I got comfortable with it, understood the file organization and found some of its helps helpful. But we've gone through a lot of changes in the last year, some personal, some technical. One resulted in swapping computers with my husband and the laptop I now use was affected by the GPU recall Apple issued a few months back. Even after being replaced it still has quirks and doesn't seem to have the power it should have. I've been experiencing a lot of Dreamweaver crashes and every use the first save causes my computer to freeze for forever, or several minutes, whichever is longer. After the initial save it seems to work fine.
That was the driving force that got me searching for something lighter. The personal changes kept me away from coding for many months, and subsequently I decided that Dreamweaver was a little too helpful ( thanks autocomplete ), resulting in lazy coding and a hazy memory of proper structure and known functions. And finally, I've started using Github and wow, additional file bloat!
My new process seems to be working much more smoothly. I landed on TextWrangler as my chosen editor and have learned to replicate the Dreamweaver helps I most appreciated -- brace balancing, multiple line indenting ( shift left using cmd+[ or right using cmd+] ), and enough color coding to hint whether I've mistyped something. And then I rely on two Terminal windows to perform my Github commands and SFTP my files to the server. If I need to upload or download more than a few files at a time, I'll open FileZilla.
It's been several weeks since I felt I *had* to open Dreamweaver and I'm a happy camper. I have more freedom in my file structure, being able to work with my local development server and send that same file to my remote web testing area and Github without having to keep multiple directories in sync so that Dreamweaver stays happy is an added plus. Also, less GUI makes you look smarter, right?
So, you're in the middle of converting video into a format that Adobe likes to work with, and .....
Exactly. Nothing. Complete freeze up. You force quit and restart. And all you get is the white Apple screen and endless circling wheel.
Now it's your heart that's stopped.
So went my weekend. My husband's year and a half old Macbook Pro needed immediate resuscitation. But more troubling was all the data that hadn't been backed-up yet.
Enter good old friend Google.
Diagnosing the Problem
The first step to a solution is identifying the problem. Without a specific known error, you're swinging with your eyes shut hoping to make contact. First step is to start up in an alternate mode--verbose mode. Verbose mode removes the loading graphic, the Apple screen, and prints the start up processes onscreen. When the boot up hangs, you'll get a text error with which you can plug a search string into Google and hopefully find repair tips.
To enter verbose mode, simply press and hold the Command+V keys while starting up. So, shutdown the mac by holding the power button or Command+Control+power. Hold Command + V and hit the power to start. You will see a black screen with white print. At some point the start up text will display errors. Note what the error says so you can do an internet search for a solution.
With my husbands laptop, he was getting a disk0s2 I/O error, which indicates a harddrive failure.
Rescuing Data
My immediate concern was rescuing the several hours worth of video footage that he had been working on, and the family photos which had not yet been backed up. I could not even start the OS in Safe Mode (Shift + Command + V) or Single User Mode (Command + S). I could boot to the recovery partition--holding Command + R on boot.
In recovery mode, I ran Disk Utility to verify the disk. Frustratingly it said it was okay, nothing to fix. I needed to reinstall the OS, but I didn't want to potentially lose important data.
Here and there I found tutorials on using Firewire or other direct networking to transfer files. I didn't have a firewire and couldn't boot to the modes which would allow peer-to-peer networking. I do have an external hard drive and a USB flash drive. And I discovered that you can access terminal in recovery mode. Also, you can still mount removable drives, like an external hard drive or USB drive.
In recovery mode, the menu bar includes a Tools drop down, which offers a few more tools than the pop up screen shows. You'll find terminal in there.
Commands to Use
Even if you are a complete Terminal novice, and this stuff seems way over your head, you can do this. If you are reading this, likely your system is already in jeopardy. And nothing we are going to do in Terminal is at all even the slightest bit destructive. Our goal is simply to make a copy of your files onto a removable media device so that you can recover them. Two important tips to remember are to type each command accurately, carefully noting spaces and cases. If a file or directory name is two words, use quotation marks around the name. Hit enter to activate the command.
The mount command will display the mount path of your external device.
The ls command will display everything within the directory (i.e. folder) you are in.
The cd to move into different directories.
The rsync command to copy the data to a removable device through USB.
Steps
On each of the screenshots, what you type is highlighted in yellow or written after # in the caption. The output is highlighted in blue.
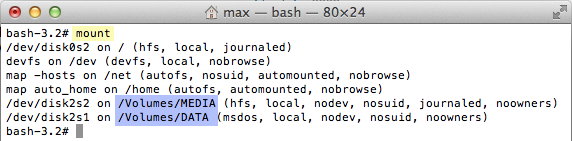
Step 1: Use mount to display the path to your removable device. Look for the text starting /Volumes/... My device has two partitions, so it displays as both /Volumes/MEDIA and /Volumes/DATA. I'll be using the /Volumes/MEDIA partition. Write down your path for future reference.
# mount
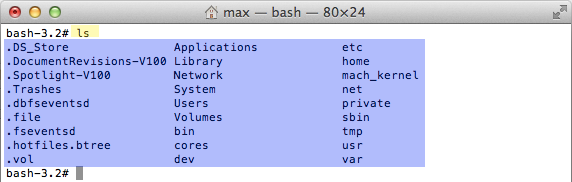
Step 2: Use ls to locate the directories that need to be recovered. I believe that Terminal in Recovery Mode drops you into the root directory, so that's what I'll show you. See the directory named Users? That's where we're going next.
# ls
Step 3: Use cd to change directories and navigate around your directory tree. If you know where you are going, you can do this all in one line, but if this is your first time we'll do this in stages. Because we are in terminal as the root user, there is no visual queue that we changed directory, so I also immediately repeated the ls command.
# cd Users # ls
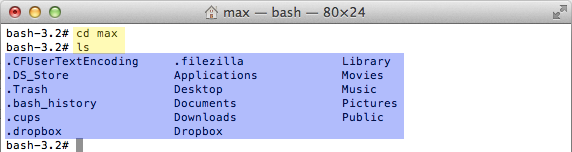
Step 4: We're almost to our home directory. As you can see in the screenshot, my username is max, but yours is likely different. Make sure you use your username and not mine in this next step. It's just a repeat of the previous step, only cd to your username.
# cd [your username] # ls
Step 5: Now you should be seeing a list of folders you are familiar with. If you are a typical user, you likely have data on your desktop, in your documents folder, and in your pictures folder. Maybe you also have music and movies. You can copy as much as you have space for on your removable device. I'll show how to copy the entire directories, for simplicity. I'll be using the Pictures directory.
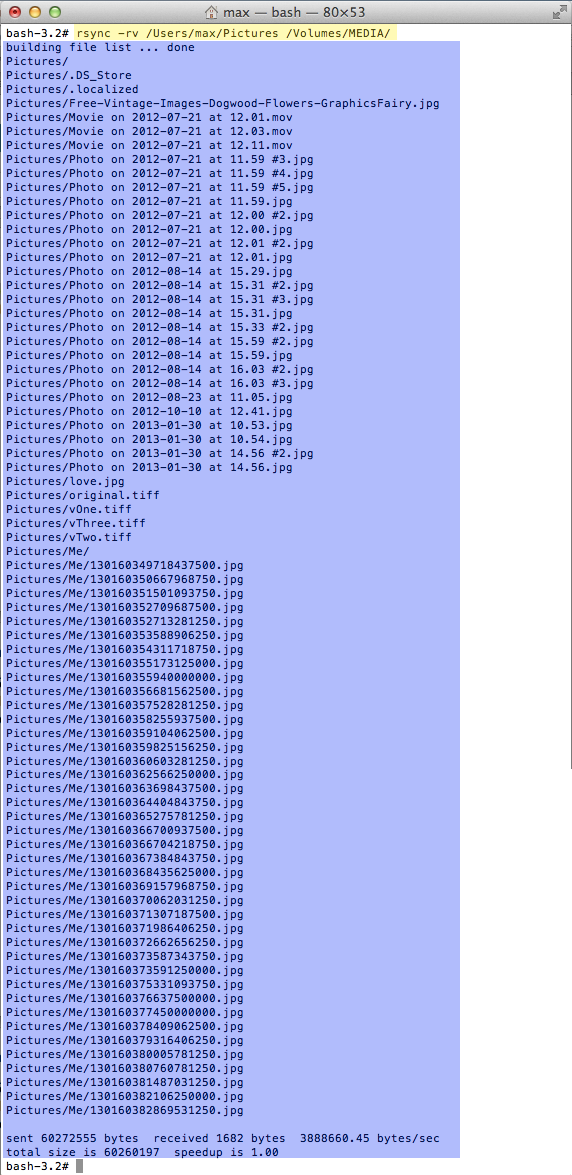
Use the rsync command, followed by the -rv options. The r (recursive) instructs the computer to move the named directory, plus all its contents. The v (verbose) is just the same as we used before when diagnosing the error; it displays all the files names so you can see what is being moved. It will work without the v, but will appear to be doing nothing.
Next, we add the path to the directory we want to copy. Remember to change max to your own username. Finally, type the path to your removable device that you noted earlier. If you forgot, you should be able to scroll up and locate the path if you haven't closed the Terminal. Note: if you have an existing folder with the same name, your files will be copied into that folder. If you want to keep it separate, add backup to the end of the command: /Volumes/MEDIA/backup.
Then you simply repeat the same process changing the word Pictures to whatever other directory name you wish to move next.
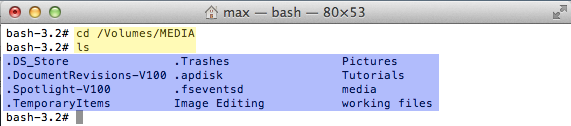
Step 6: This step is optional. If you used the verbose option, you can see the files as they are transferred. But you can also confirm their arrival by cd-ing to the drive. Use the cd command and type the same path to which you have been copying all the files. And there it is among the already existing directories.
# cd /Volumes/[your device name] # ls
Repair
After you've recovered your data, you can take whatever steps necessary to fix the problem without worries of data loss. Note that this applies only to actual files and data stored in your file system. Saved passwords and bookmarks are beyond the scope of this post, but if you can locate where they are stored via an internet search (probably in an application library), copying them over would be a repetition of the steps above.
In our case, after I recovered what was vital to us, I chose the option to install the OS from the popup menu. In fact, this did not erase personal data, only rewrote actual operating system files. Had this step not worked, I would have had to wipe the hard drive and then install the OS again, which would have resulted in the loss of all personal data.